MicroPython Driver for TM1637 & 4-Digit LED Display
Contents
Introduction
This a MicroPython driver written specifically for the BBC micro:bit that will work with the TM1637 LED display driver. The library provides methods that allows the user to operate a 7-segment LED display with 4-digits.
The 7-segment LED display and TM1637 LED driver chip are discussed in some detail here.
The TM1637 is readily available on inexpensive breakout boards incorporating 7-segment LED 4-digit displays. There are two versions of the 4-digit LED display. Fig 1 illustrates the display that has a decimal point after each digit.
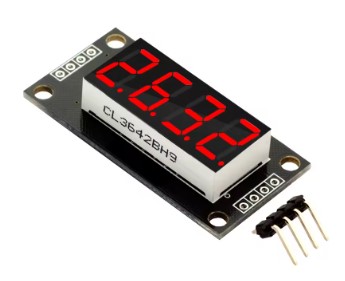

Fig 1 - TM1637 breakout board with 7-segment LED 4-digit display: [L to R] front side and rear side.
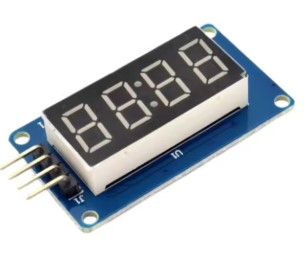
Fig 2 shows the display with a colon between the second and third digits. This board is suitable for displaying clock time. This MicroPython driver caters for both types of displays.
Connecting the TM1637 Board
The TM1637 communicate via a propriety 2-wire serial protocol. It has similarities to I2C but doesn't follow the published standard. The default connections to the micro:bit are shown in the following table:
| micro:bit | AHT30 |
|---|---|
| 3.3V | VIN |
| GND | GND |
| Pin 8 | CLK |
| Pin 9 | DIO |
Pin 8 and Pin 9 are the default micro:bit pins defined in the driver's class constructor. However the user may override this by defining other digital pins of the micro:bit.
Driver Overview
The driver code can be:
- Copied from this webpage onto the clipboard then pasted into the MicroPython editor e.g. the Mu Editor. It should be saved as fc_tm1637.py - OR -
- Download as a zip file using the link. Unzip the file and save it as fc_tm1637.py into the default directory where the MicroPython editor e.g. Mu Editor saves python code files.
After saving the fc_tm1637.py file to the computer it should be copied to the small filesystem on the micro:bit. The examples on this page will not work if this step is omitted. Any MicroPython editor that recognises the micro:bit will have an option to do this.
The Mu Editor is recommended for its simplicity. It provides a Files button on the toolbar for just this purpose.
Class constructorThe driver is implemented as a class. The first thing to do is call the constructor. This provides an instance of the class.
Syntax:
instance = TM1637(CLK=pin8, DIO=pin9, Bright=7)

Where:
  CLK and DIO : the micro:bit digital pins connected to the
  clock and data pins respectively on the display board.
  The default CLK pin connection to the micro:bit is pin8.
  The default DIO pin connection to the micro:bit is pin9.
  However in both cases any available digital pin can be used.

  Bright : is the setting (0 to 7) that determines the
  brightness of the display.

Example
from fc_tm1637 import *
# Use the defaults
display1 = TM1637()
# Overriding the defaults
display2 = TM1637(pin0, pin1)
This assumes that the file fc_tm1637.py has been successfully copied to the micro:bit's filesystem as described above.
Here's a tutorial on the micro:bit's GPIO pins if in doubt about which pins are suitable.
Class MethodsThis display driver is straight forward to use. The driver provides methods that:
- Write to the display:
- WriteNumber()
- WriteTime()
- Control the display's brightness:
- SetBrightness()
- GetBrightness()
- Miscellaneous methods:
- Test() : Lights all segments of the display.
- Off() : Turns the display off.
Writing a Number to the Display
The WriteNumber() method allows the user to display an integer or floating point number. Both positive and negative numbers are catered for by this method.
In the case of a floating point number it is assumed that the 4-digit display is of the variety that has a decimal point after each digit; see Fig 1.
A floating point number with too many digits after the decimal point is rounded to fit the display.
If the number is greater than 9999 or smaller than -999 then 9999 and -999 respectively is written to the display.
The number is right-justified on the display and padded with spaces to the left as needed.
Syntax:
WriteNumber(Number, Bright=None)

Where:
  Number : an integer or floating point number to display
  Bright : (optional) the display brightness (0 to 7)

Examples:
from fc_tm1637 import *
from microbit import sleep

display1 = TM1637()

# Display an integer for 5 seconds
display1.WriteNumber(1234)
sleep(5000)

# Display a floating point number
# for 5 seconds and dim the display
display1.WriteNumber(9.876543, 1)
sleep(5000)

# Display an oversize number
# at full brightness
display1.WriteNumber(456789, 7)

Output:
(1) 1234 for 5 seconds
(2) 9.877 for 5 seconds, dimmed display
(3) 9999 , bright display
Notes from the above example:
Output (2) : The float value 9.876543 is rounded to three decimal points i.e. 9.877 so that it fits the 4-digit display.
Output (3) : The value 9999 is shown because the integer number 456789 is too large for the 4-digit display.
Writing a Time to the Display
The WriteTime() method is useful if the 4-digit display is of the type that has a colon between the second and third digits; see Fig 2. The obvious use for this method is to display a clock time in the format HH:MM.
Syntax:
WriteTime(Num1, Num2)

Where:
  Num1, Num2 : Any integer value between 0 and 99
  inclusive. The string '----' is displayed if
  either Num1 or Num2 doesn't meet both conditions.

  Num1 is displayed with digits 1 and 2 on the display.
  Num2 is displayed with digits 3 and 4 on the display.
  The colon between digits 2 and 3 is illuminated.

Example:
from fc_tm1637 import *
display = TM1637()
display.WriteTime(12, 45)

Output:
  The string 12:45 is displayed.
Controlling the Display's Brightness
The SetBrightness() method sets the display brightness while the method GetBrightness() returns the current brightness.
Syntax:
SetBrightness(Bright)

Where:
  Bright : An integer value between 0 and 7
  inclusive.

Syntax:
GetBrightness()

Returns:
  An integer value between 0 and 7 inclusive.

Example:
# A 7-segment LED 4-digit 'clock'
# display is driven by a TM1637.

# The display has its brightness
# increased/decreased incrementally
# from brightest to dullest and back
# to full brightness in a non-ending
# loop.

from fc_tm1637 import *
from microbit import sleep

display = TM1637()
display.WriteTime(12, 45)

while True:
    # Decrementally decrease brightness
    for bright in range(7, -1, -1):
        display.SetBrightness(bright)
        sleep(500)
    # Incrementally increase brightness
    for bright in range(1, 7):
        display.SetBrightness(bright)
        sleep(500)
Miscellaneous Methods
Testing the Display
The Test() method turns all segments of the display on at maximum brightness. This allows to the user to determine if all LED segments are operational. The method takes no arguments.
Turning the Display Off
The Off() method turns the display off. This could be desirable if the display isn't being used as it will reduce the power requirements of the circuit. The method takes no arguments.
Example:
# A 7-segment LED 4-digit display
# is driven by a TM1637.

# All segments are lit at maximum
# brightness for 500ms, then then
# the display is turned off for
# 500ms. This loop is repeated
# indefinitely.

from fc_tm1637 import *
from microbit import sleep

display = TM1637()

while True:
    display.Test()
    sleep(500)
    display.Off()
    sleep(500)
The example above will flash all LED segments on and off with maximum brightness at a frequency of 1Hz.
Example
This example uses an SHT40 sensor to read relative humidity and temperature. The humidity and temperature values are written to separate 7-segment LED 4-digit displays driven by TM1637 chips.
Components
- Breadboard and dupont wires
- 2 X 7-segment LED 4-digit (with decimal points) displays with TM1637
- SHT40 humidity & temperature sensor breakout board
Connections
- Connect the power and ground pins of both displays and the SHT40 sensor to the micro:bit's 3.3V and GND pins respectively.
- Display 1 (humidity) : Connect CLK and DIO pins to the micro:bit's pin0 and pin1 respectively.
- Display 2 (temperature) : Connect CLK and DIO pins to the micro:bit's pin8 and pin9 respectively.
- SHT40 sensor : Connect SCL and SDA pins to the micro:bit's pin19 and pin20 respectively.
Drivers
The following driver module files need to be copied to the micro:bit's filesystem:
- Displays : fc_tm1637.py
- SHT40 : fc_sht4x.py
Code
# This program will read humidity and
# temperature from an SHT40 sensor
# every 5 seconds. The humidity and
# temperature readings will be
# displayed on separate 7-segment LED
# 4-digit displays that are driven
# by TM1637 LED driver chips.

from fc_tm1637 import *
from fc_sht4x import *
from microbit import sleep


display1 = TM1637(pin0, pin1, 7) # humidity
display2 = TM1637(pin8, pin9, 7) # temperature
sensor = SHT4X()

while True:
    humidity = sensor.RH()
    temperature = sensor.T()
    display1.WriteNumber(humidity)
    display2.WriteNumber(temperature)
    sleep(5000)
.jpg)
Enjoy!
TM1637 Driver Code for micro:bit
Download as zip file
'''
TM1637 7-Segment LED 4-Digit
MicroPython driver for micro:bit

AUTHOR: fredscave.com
DATE:   Dec, 2024
VERSION 1.00
'''

from microbit import *
from micropython import const

CMD_DATA = const(0b01000000)
CMD_ON = const(0b10001000)
CMD_OFF = const(0b10000000)
ADDR_DISPLAY = const(0xC0)

PATTERN = {'0':0x3F, '1':0x06, '2':0x5B, '3':0x4F, '4':0x66,
           '5':0x6D, '6':0x7D, '7':0x07, '8':0x7F, '9':0x6F,
           ' ':0x00, '-':0x40}

class TM1637():
    def __init__(self, CLK=pin8, DIO=pin9, Bright=7):
        self.CLK = CLK
        self.DIO = DIO
        self.SetBrightness(Bright)
        self.Digits = bytearray([0, 0, 0, 0])

    def _Start(self):
        self.DIO.write_digital(0)
        self.CLK.write_digital(0)

    def _Stop(self):
        self.DIO.write_digital(0)
        self.CLK.write_digital(1)
        self.DIO.write_digital(1)

    def _Write_Byte(self, digit):
        for i in range(8):
            self.DIO.write_digital((digit >> i) & 1)
            self.CLK.write_digital(1)
            self.CLK.write_digital(0)
        self.CLK.write_digital(0)
        self.CLK.write_digital(1)
        self.CLK.write_digital(0)

    def _Write_Bytes(self):
        self._Send_Data_CMD()
        self._Start()
        self._Write_Byte(ADDR_DISPLAY)
        for digit in self.Digits:
            self._Write_Byte(digit)
        self._Stop()
        self._Display_Control()

    def _Send_Data_CMD(self):
        self._Start()
        self._Write_Byte(CMD_DATA)
        self._Stop()

    def _Display_Control(self):
        self._Start()
        self._Write_Byte(CMD_ON | self.Bright)
        self._Stop()

    def SetBrightness(self, Bright):
        self.Bright = Bright
        if Bright not in range(8):
            self.Bright = 7
        self._Send_Data_CMD()
        self._Display_Control()

    def GetBrightness(self):
        return self.Bright

    def Test(self):
        self.Digits = [0b11111111] * 4
        self._Write_Bytes()

    def Off(self):
        self._Send_Data_CMD()
        self._Start()
        self._Write_Byte(CMD_OFF)
        self._Stop()

    def WriteNumber(self, Number, Bright=None):
        if isinstance(Number, int):
            self._Integer(Number)
        if isinstance(Number, float):
            self._Float(Number)
        if Bright != None:
            self.SetBrightness(Bright)
        self._Write_Bytes()

    def WriteTime(self, Num1, Num2):
        data_list = ['-'] * 4
        isint1 = isinstance(Num1, int)
        isint2 = isinstance(Num2, int)
        if isint1 and isint2:
            inrange1 = Num1 in range(0, 100)
            inrange2 = Num2 in range(0, 100)
            if inrange1 and inrange2:
                if Num1 < 10:
                   data_list[0] = ' '
                   data_list[1] = str(Num1)
                else:
                    data_list[0] = str(Num1)[0]
                    data_list[1] = str(Num1)[1]
                if Num2 < 10:
                    data_list[2] = '0'
                    data_list[3] = str(Num2)
                else:
                    data_list[2] = str(Num2)[0]
                    data_list[3] = str(Num2)[1]
        self.Digits = self._Parse(data_list)
        self.Digits[1] |= 0b10000000
        self._Write_Bytes()

    def _Float(self, Number):
        if Number > 9999:
            self.Digits = self._Parse(['9', '9', '9', '9'])
            return
        elif abs(Number) > 999:
            self.Digits = self._Parse(['-', '9', '9', '9'])
            return
        elif self._Float_Too_Small(Number):
            self.Digits = self._Parse(['-', '-', '-', '-'])
            return
        else:
            dp = str(Number).find('.')
            data = round(Number, 4-dp)
            if dp == 4:
                data = int(data)
        dp -= 1
        data_list = list(str(data).replace('.', ''))
        spaces = 4 - len(data_list)
        dp += spaces
        data_list = ([' '] * spaces) + data_list
        self.Digits = self._Parse(data_list)
        self.Digits[dp] = self.Digits[dp] | 0b10000000

    def _Float_Too_Small(self, Number):
        if (Number < 0) and (int(round(Number, 2) * 100) == 0):
            return True
        elif (Number > 0) and (int(round(Number, 3) * 1000) == 0):
            return True
        else:
            return False

    def _Integer(self, Number):
        if Number > 9999:
            self.Digits = self._Parse(['9', '9', '9', '9'])
        elif Number < -999:
            self.Digits = self._Parse(['-', '9', '9', '9'])
        else:
            data_string = str(Number)
            data_list = [' ', ' ', ' ', ' ']
            start = 4-len(data_string)
            for x in range(start, 4):
                data_list[x] = data_string[x-start]
            self.Digits = self._Parse(data_list)

    def _Parse(self, data_list):
        digits = bytearray(4)
        for x in range(4):
            digits[x] = PATTERN.get(data_list[x], 0x00)
        return digits