MicroPython Driver for OpenLog
Contents
Introduction
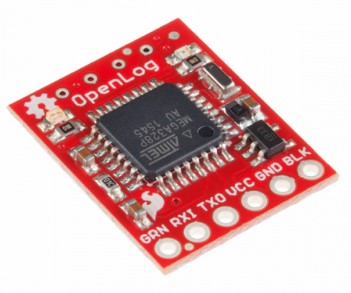
This a MicroPython driver for the OpenLog serial data logger specifically for the BBC micro:bit.
The OpenLog is discussed in some detail here. You are advised to read this before attempting to use this driver.

The driver can be:
- Copied from this webpage onto the clipboard then paste into the MicroPython editor e.g. the Mu Editor. It should be saved as fc_openlog.py - OR -
- Download as a zip file using the link. Unzip the file and save it as fc_openlog.py into the default directory where the MicroPython editor e.g. Mu Editor saves python code files.
After saving the fc_openlog.py file to the computer it should be copied to the small filesystem on the micro:bit. The examples on this page will not work if this step is omitted. Any MicroPython editor that recognises the micro:bit will have an option to do this.
The Mu Editor is recommended for its simplicity. It provides a Files button on the toolbar for just this purpose.
Connecting the OpenLog
The OpenLog communicates via UART serial. Connecting to the micro:bit is a simple exercise. The main thing to remember is the Tx and Rx lines must be crossed between the micro:bit and the OpenLog.
Suggested Hookup Guide
| micro:bit | OpenLog |
|---|---|
| 3.3V | VCC |
| GND | GND |
| Pin 8 | RXI |
| Pin 9 | TXO |
| Pin 16 | GRN |
TXO and GRN Pins
Don't confuse the GRN and GND pins on the OpenLog! They have very different functions. The GND pin is Ground. The GRN pin is the reset pin on the OpenLog's ATmega328 microcontroller.
This driver will work for simple data logging without connecting the TXO and GRN pins. However there is always a risk with this minimalist approach that data may be lost.
The driver's constructor uses these two pins to check that the OpenLog is successfully powered up and ready to receive data.
Alternative RXI, TXO and GRN Pins
The suggested hookup in the table above are the default parameters in the driver's constructor. The user is free to change these pin assignments when the constructor is called. Any available digital pins on the micro:bit may be used.
Here's a guide to the micro:bit's GPIO pins.
Driver Overview
The driver is implemented as a class.
Class Constructor
The first thing to do is declare an instance of the class. The constructor attempts to initialise the OpenLog to the state where it is ready to receive logging data.
Syntax:
instance = OPENLOG(=pin8, Rx=pin9, Reset=pin16)

Where:
  Tx : The UART transmit pin on the micro:bit.
  This is connected to the RXI pin on the OpenLog.

  Rx : The UART receive pin on the micro:bit.
  This is connected to the TXO pin on the OpenLog.

  Reset : This pin used to initialise the OpenLog.

Examples:
# Import the driver module
from fc_openlog import *

# Use the default pins
OpenLog = OPENLOG()
OpenLog.Close()

# Change the pins
OpenLog = OPENLOG(Tx=pin0, Rx=pin1, Reset=pin2)
OpenLog.Close()

WARNING:
The micro:bit's REPL becomes disabled
When the constructor is executed.

To restore the REPL the code MUST call the
Close() method before the program completes.

The Close() method is described below.
This assumes that the file fc_openlog.py has been successfully copied to the micro:bit's filesystem as described above.
Baud Rate
By default the OpenLog operates at a 9600 baud rate. This might seem pedestrian but even so the OpenLog will keep up in normal operation unless the user really does try to drown it with data.
The baud rate can be changed if really, really needed. it's a two step process:
- The baud rate is stored as the constant BAUD at the top of the driver code file. Edit this to another value, save the file (fc_openlog.py) and recopy to the micro:bit's file system
- Edit the configuration file (config.txt) on the DataLog's microSD card. If in doubt, read how to do that here.
Acceptable values include: 2400, 4800, 9600, 19200, 38400, 57600 and 115200.
Class Methods
The driver provides methods that:
- Writes data to the OpenLog
- Returns the status of the OpenLog
- Closes the connection with the OpenLog and restores the REPL
Following is a full list of methods that are user callable. Each method is described and example use given in the sections below.
- Write()
- Writeln()
- WriteCSV()
- Status()
- Close()
Writing to the OpenLog
The micro:bit's UART methods (microbit module) expect buffer content to be strings, bytes objects or bytearray objects. However this OpenLog driver takes care of all type conversions, which means strings, numbers (integers and floats) and binary data can all be intermixed and logged.
There are three methods provided for writing data out to the logger:
- Write() will simply stream buffers of data to the data logger. This is a good mode for logging binary data.
- Writeln() appends a newline character (ASCII 10) to the end of the buffer data.
- WriteCSV() is designed to write comma delimited data. This is the method to use if continuously logging data e.g. from sensors. After the logging is complete, the file can easily be open in a spreadsheet program (such as Microsoft Excel) for further analysis and report preparation.
Syntax:
Write(Buffer)

Where:
  Buffer : Data to be written out to the OpenLog.
  Must be of type bytes, bytearray, string or numerical.

Syntax:
Writeln(Buffer=None)

Where:
  Buffer : Data to be written out to the OpenLog.
  Must be of type bytes, bytearray, string or numerical.
  A newline character (ASCII 10) is added to the end of Buffer.
  If the Buffer argument is omitted then only a newline
  character is sent to the OpenLog.

Syntax:
WriteCSV(Buffer)

Where:
  Buffer must be either a list or tuple.
  Anything else is ignored.

  Each call to this method will log one line of comma
  delimited data elements.

  The list or tuple will contain one or more data elements.
  Each element must be of type string or numerical.
  This method is not for logging binary data.

  Each data element is written to the OpenData in turn.
  with a comma inserted between each element.

  A newline character is sent after the last element
  has been written out.
These methods are simple to use and best illustrated with some examples. The first example demonstrates the use of Write() and Writeln().
Example 1

# Demonstrate use of the Write() and Writeln()
# methods from the OpenLog driver.

from fc_openlog import *
from random import getrandbits

# Use the default pins.
OpenLog = OPENLOG()

# Write some binary data.
# The function getrandbits(n) returns
# an integers with n bits.
for i in range(15):
    OpenLog.Write(bytes([getrandbits(8)]))
OpenLog.Writeln()

# Write some strings.
S1 = 'Mary had a little lamb'
S2 = 'Its fleece was white as snow'
OpenLog.Writeln()
OpenLog.Writeln(S1)
OpenLog.Writeln(S2)

# Write some numbers, one to a line.
NumList = [1, 2, 3.1415, -15.45798]
OpenLog.Writeln()
for n in NumList:
    OpenLog.Writeln(n)

# Get the REPL back!
OpenLog.Close()
Output:
The following was found in the log file on the OpenLog's MicroSD card:

EÂÖÆ£ÛRúû>¡î°

Mary had a little lamb
Its fleece was white as snow

1
2
3.1415
-15.45798
The next example uses the WriteCSV() method to create and populate a comma delimited text file that is easy to open in any spreadsheet program for further analysis.
Example 2

# Demonstrate the use of the WriteCSV()
# method from the OpenLog driver.

from fc_openlog import *

# Use the default pins.
OpenLog = OPENLOG()

# Log 10 rows of data to the OpenLog
# as a comma delimited file.
# Each row will have 3 data points.

# Create a list to hold 3 elements
Buffer = [None] * 3
for n in range(5, 15):
    Buffer[0] = n ** (1/2)
    Buffer[1] = n ** (1/3)
    Buffer[2] = n ** (1/4)
    OpenLog.WriteCSV(Buffer)

# Get the REPL back!
OpenLog.Close()
Output:
The following was found on the OpenData's MicroSD card:

2.236068,1.709976,1.495349
2.44949,1.817121,1.565085
2.645751,1.912931,1.626577
2.828427,2.0,1.681793
3.0,2.080084,1.732051
3.162278,2.154435,1.778279
3.316625,2.22398,1.82116
3.464102,2.289428,1.86121
3.605551,2.351335,1.898829
3.741657,2.410142,1.934336
The example above writes lines with each line containing the the square root, the cube root and the quad root respectively of the numbers from 5 to 14. The calculated roots on each line are separated only by a comma.
Reading the OpenLog Status
The OPENLOG() constructor attempts to initialise the OpenLog and bring it to a state ready to receive logging data. The Status() method has no arguments and returns a boolean indicating whether the OpenLog was successfully initialised.
Closing the OpenLog
The OpenLog communicates via UART serial. The micro:bit has only a single hardware UART which normally supports the MicroPython REPL. The OPENLOG() constructor redirects the micro:bit's UART to support serial communications with the OpenLog.
As a result, at this point the REPL becomes inaccessible. The Close() method restores the REPL. It is essential that a program using this driver always calls this method before finishing execution.
If the worst happens and the program terminates (perhaps through an unhandled exception) before Close() is called the user can restore the REPL by flashing another program (anything will do) to the micro:bit. This forces the UART to be reset.
Example
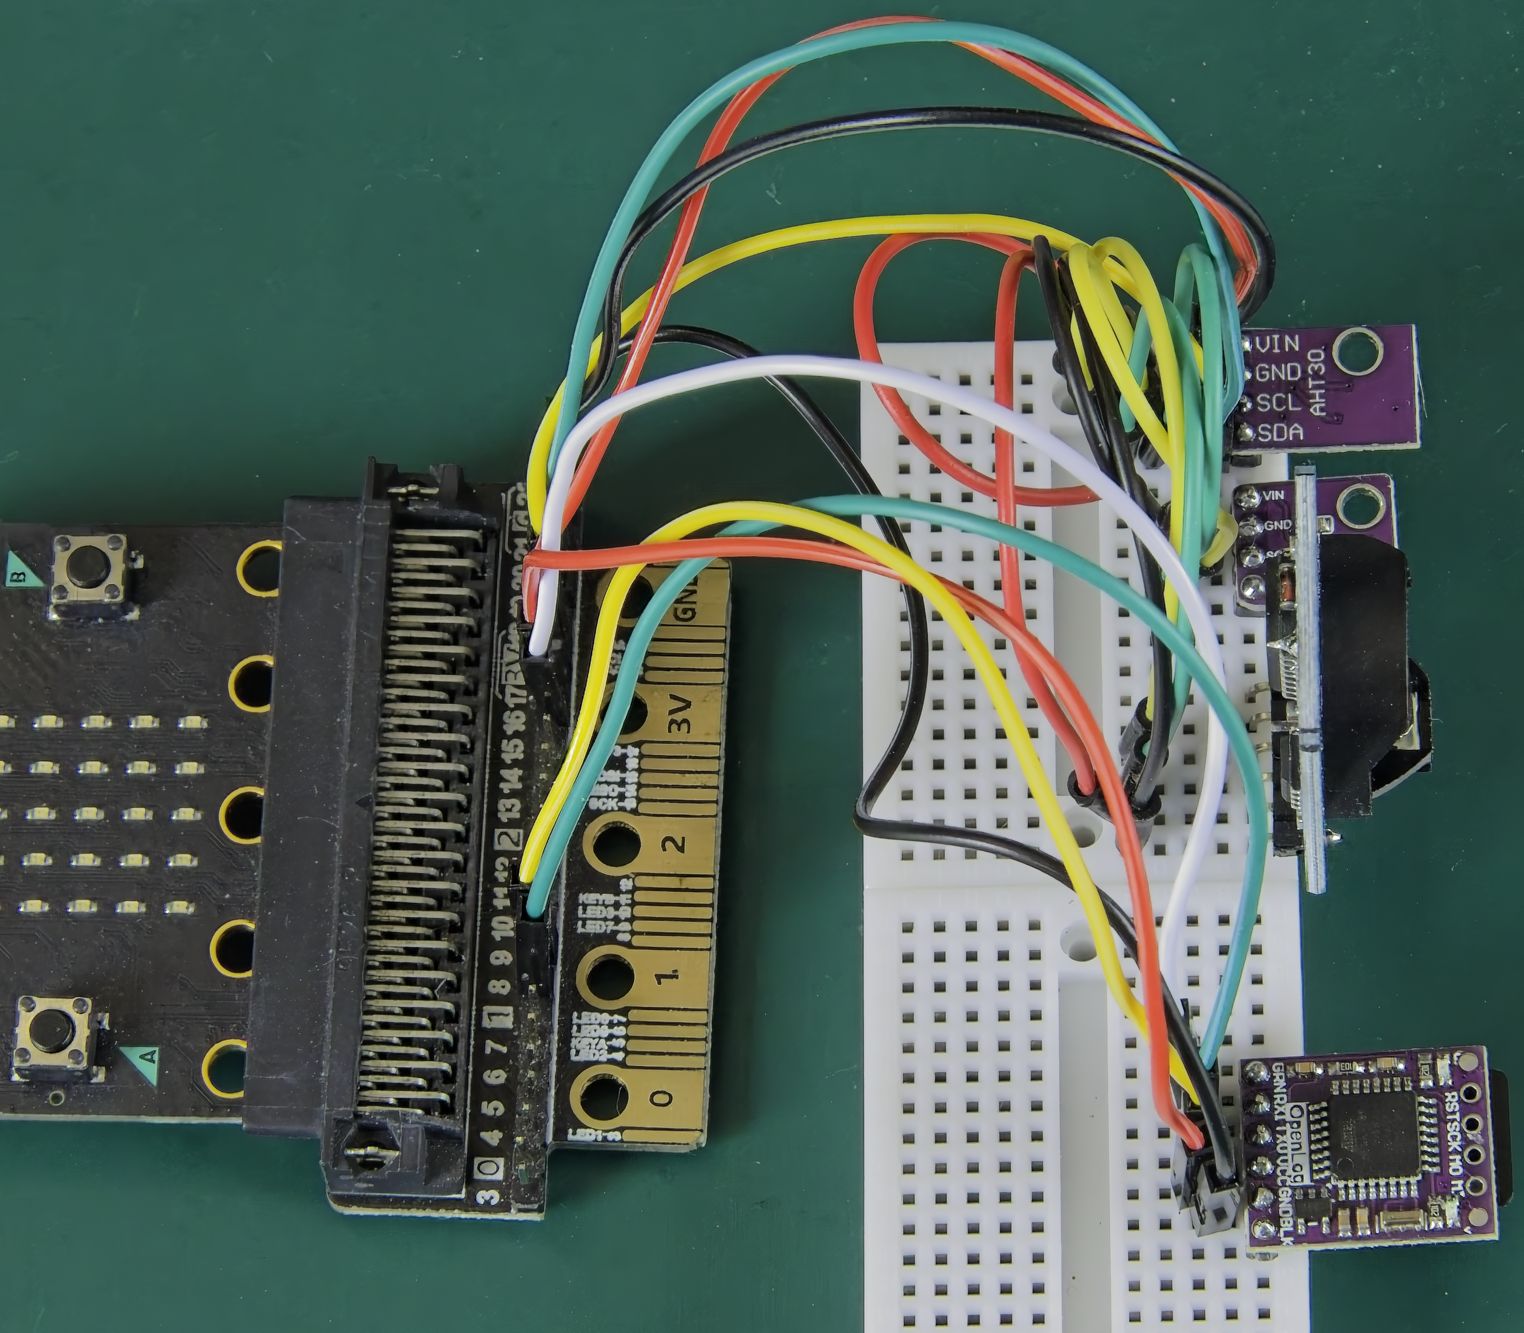
This is a comprehensive example where a RTC (real-time clock) and two humidity/temperature sensors plus the OpenLog will all be hooked up to the micro:bit.
The time from the RTC with humidity and temperature readings from both sensors will be logged approximately every second to the OpenLog for a period of about an hour.
Hookup Guide
This project will use the following hardware:
- OpenLog serial data logger
- Hook up to pin8, pin9 and pin16 on the microbit as described above. Ensure fc_openlog.py has been copied to the micro:bit's file system
- DS3231 real-time clock
- Copy fc_ds3231.py to the micro:bit's file system.
- AHT30
- Copy fc_aht30.py to the micro:bit's file system.
- SHT40
- Copy fc_sht4x.py to the micro:bit's file system.
The DS2321, AHT30 and SHT40 are all I2C devices. Connect the pins of them all to the micro:bit as follows:
- VCC to micro:bit 3.3V pin
- GND to micro:bit GND
- CLK to micro:bit pin19
- SDA to micro:bit pin20

Setting the time on the DS3231
You can manually set the current time on the DS3231 by copying the following lines into the REPL:
from fc_ds3231 import *Clock = DS3231()Clock.Time(h,m,s)Clock.Time()
Change 'h' for the 24Hr clock current hour, 'm' for current minutes and 's' for current seconds e.g. Clock.Time(14, 25, 10).
The Code
Copy the following code to the MicroPython editor (e.g. Mu) then flash it to the micro:bit.
# The following are hooked up to the micro:bit
# OpenLog - serial data logger
# DS3231 - realtime clock
# AHT30, SHT40 - humidity & temperature sensors

# The time and humidity/temperature readings
# will be logged to the OpenLog each second.
# The logged file will be a comma separated
# text file suitable to import in spreadsheets.

from fc_openlog import *
from fc_ds3231 import *
from fc_aht30 import *
from fc_sht4x import *
from microbit import sleep

OpenLog = OPENLOG()
Clock = DS3231()
aht30 = AHT30()
sht40 = SHT4X()

# Log the headers
buf = ['Time', 'AHT30-T', 'SHT40-T',
       'AHT30-RH', 'SHT40-RH']
OpenLog.WriteCSV(buf)

# Log time and humidity/temperature from
# both sensors at around 1 second intervals
# for about an hour.
for i in range(3600):
    buf[0] = Clock.Time()
    aht_values = aht30.Read()
    sht_values = sht40.Read()
    buf[1] = aht_values[1]
    buf[2] = sht_values[0]
    buf[3] = aht_values[0]
    buf[4] = sht_values[2]
    OpenLog.WriteCSV(buf)
    sleep(800)

# Restore the REPL
OpenLog.Close()
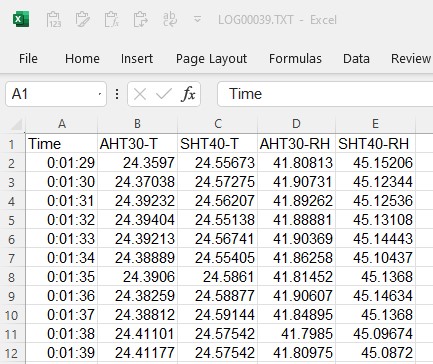
After the program completed the logging file was examined. There was 3,600 lines of data as expected. Here is a look at the first few line:
Time,AHT30-T,SHT40-T,AHT30-RH,SHT40-RH
00:01:29,24.3597,24.55673,41.80813,45.15206
00:01:30,24.37038,24.57275,41.90731,45.12344
00:01:31,24.39232,24.56207,41.89262,45.12536
00:01:32,24.39404,24.55138,41.88881,45.13108
00:01:33,24.39213,24.56741,41.90369,45.14443
00:01:34,24.38889,24.55405,41.86258,45.10437
00:01:35,24.3906,24.5861,41.81452,45.1368
00:01:36,24.38259,24.58877,41.90607,45.14634
00:01:37,24.38812,24.59144,41.84895,45.1368
00:01:38,24.41101,24.57542,41.7985,45.09674
00:01:39,24.41177,24.57542,41.80975,45.0872
The entire logging file was then imported into Microsoft Excel. This took less than a minute with the comma delimited styling of the text file.

Then after some simple analysis in Excel:

The temperatures closely match between the two sensors. The SHT40 registers slightly higher. However the relative humidity is a different story. The SHT40 consistently measured about 3.5% higher in absolute terms than the AHT30.
Enjoy!
OpenLog Driver Code for micro:bit
Download as zip file
'''
OpenLog
Serial (UART) data logger
MicroPython driver for micro:bit

AUTHOR: fredscave.com
DATE  : 2024/12
VERSION : 1.00

micro:bit pin8 (tx) - OpenLog RX pin
micro:bit pin9 (rx) - OpenLog TX pin
micro:bit pin16     - OpenLog GRN pin
'''

from microbit import *
from utime import ticks_ms, ticks_diff

BAUD = 9600
NEWLINE = chr(10)

class OPENLOG():
    def __init__(self, Tx=pin8, Rx=pin9, Reset=pin16):
        uart.init(baudrate=BAUD, tx=Tx, rx=Rx)
        self.ResetPin = Reset
        Reset.write_digital(0)
        sleep(200)
        Reset.write_digital(1)
        self.OK = False
        start = ticks_ms()
        while ticks_diff(ticks_ms(), start) < 5000:
            if uart.any():
                if chr(uart.read(1)[0]) == '<':
                    self.OK = True
                    break

    def Close(self):
        sleep(2500)
        uart.init(115200)

    def Write(self, Buffer):
        if isinstance(Buffer, (bytes, bytearray, str)):
            uart.write(Buffer)
        elif isinstance(Buffer, (int, float)):
            uart.write(str(Buffer))
        sleep(10)

    def Writeln(self, Buffer=None):
        if isinstance(Buffer, (bytes, bytearray, str,
                               int, float)):
            if Buffer != None:
                self.Write(Buffer)
        uart.write(NEWLINE)
        sleep(10)

    def WriteCSV(self, Buffer):
        if isinstance(Buffer, (list, tuple)):
            total = len(Buffer)
            BufStr = ''
            count = 1
            for e in Buffer:
                if isinstance(e, (str)):
                    BufStr += e
                elif isinstance(e, (int, float)):
                    BufStr += str(e)
                if count != total:
                    BufStr += ','
                    count += 1
            BufStr += NEWLINE
            self.Write(BufStr)

    def Status(self):
        return self.OK